With Thanksgiving right around the corner, I wanted to revisit my Roasted Butternut Squash Salad post and provide you with an actual recipe that you can use! It is also really cheap to make!
INGREDIENTS:
* 1 butternut squash (or other winter squash), de-seeded and cut into quarters
* 1 small red onion, thinly sliced
* 2 Tbsp. olive oil (or vegetable broth or water for a fat-free version)
* 1/4 cup dried cranberries
* 2 Tbsp. orange juice (or water)
* 1/2 tsp. maple syrup (or brown sugar)
* 1 tsp. red wine vinegar (or rice vinegar)
* 1 tsp. sherry
* 3 tsp. thyme leaves
* salt and pepper to taste
DIRECTIONS:
* In a 375 degree oven, roast the squash in a shallow baking pan with about an inch of water for about 30-40 minutes or until fork tender. Allow to cool and then use a peeler to peel off the skin and cut the squash into cubes (this step can be done a day in advance).
* In a small bowl, combine the orange juice, maple syrup, and vinegar and sherry.
* Add the dried cranberries and allow that to sit for about 10 minutes so the cranberries plump up a bit.
* In a heavy bottomed pan, heat the olive oil on medium high heat and saute the red onion for 1 minute and then add the chunks of butternut squash for a few more minutes.
* Add in the cranberry mixture, turn the heat down to medium and cook for 3-5 minutes until the juices thicken into a syrup consistency.
* Sprinkle in the thyme leaves and salt and pepper and toss.
Enjoy!
Saturday, November 22, 2008
Thursday, November 20, 2008
Seared Albacore Spinach Salad with Rosemary
My dear friend, Valori made this salad, which she describes as being "packed full of fresh flavors just waiting to burst in your mouth! It is filling, visually pleasing, and above all healthy! Great for a late lunch or a light dinner".
Salads are a great way to explore flavor combinations, use up what you have in your fridge and cupboards and get a significant amount of healthy vegetables into your diet. Make sure that you wash all vegetables thoroughly because any pesticides, grit, dirt or residues could make the salad bitter and be harmful to your health. I try to buy organic vegetables whenever I can, but especially when it is for a salad or will otherwise be eaten raw.
INGREDIENTS FOR BALSAMIC VINAIGRETTE:
* 1 cup olive oil
* 1/2 c. balsamic vinegar
* 3 or 4 cloves garlic, minced finely
* 3 Tbsp. Parmesan cheese
* Salt and pepper to taste
Whisk together vinegar, garlic and grated cheese. Gradually add the olive oil. Salt and pepper to taste. Set aside to let the flavors develop. You do not need to refrigerate the dressing while you prepare the salad because you want the oils to remain room temperature for the flavors to marry and avoid becoming thick.
Note: If you use a store-bought salad dressing instead, I would recommend avoiding fruit based or flavored ones because it will be too sweet for this kind of salad.
INGREDIENTS FOR SPINACH SALAD:
3 cups of fresh spinach
3 leaves of fresh romaine lettuce, ribs removed and leaves torn
1 fresh ripe avocado, diced with a squeeze of lemon juice to prevent browning
1/2 washed red bell pepper (optional); diced finely
6-8 fresh cherry tomatoes
1/2 ripe mango
1/2 cup fresh raspberries
1 Tbsp. sunflower seed oil
1/8 tsp fresh rosemary, chopped finely
4 ounces of fresh albacore, sashimi grade, between 1/2 to 3/4 inch thick
5 Tbsp. Balsamic Vinaigrette (recipe above)
2 Tbsp. slivered almonds, unsalted (optional)
DIRECTIONS:
* Thoroughly wash, rinse and dry the spinach and romaine lettuce.
* Slice the mango into thin slender slices about two inches long, squared ends, and about 1/4 of an inch thick.
* Drizzle a small puddle of the vinaigrette on the bottom of two deep plates.
* Place a big handful of the spinach and lettuce mix on top of the balsamic dressing.
* Sprinkle on the bell pepper and divide up the avocado slices and cherry tomatoes between the two plates. Line the edges of the side with the raspberries.
* Neatly place 5-6 slices of mango around salad poking outward like a porcupine.
* Rub 1 tsp. of the oil onto the outside of the fish, salt and pepper to taste and sprinkle on the fresh rosemary.
* In a heavy bottomed non-stick skillet on medium-high heat, heat oil and place fish on the skillet for about 15-30 seconds on each side. A nice hot pan will ensure that the fish is seared quickly without cooking it all the way through. Be careful not to overcook--you want the fish to be lightly cooked (white in appearance) about 3 millimeters on each side.
* Remove fish from heat, allow to cool slightly and slice into 1/4 inch pieces.
* Arrange slices of seared albacore in a fan-like design over the prepared salad.
* Drizzle on more balsamic vinaigrette if desired.
* Optional: garnish with slivered almonds.
Serving Suggestion: Serve salad with a glass of blush wine.
Thanks, Valori, for your recipe contribution! If anyone else is interested in doing a guest spotlight, feel free to contact me and provide a blurb, photo and instructions! :)
Tuesday, November 18, 2008
How to Cook Everything Vegetarian by Mark Bittman
I am sure that we have become good enough friends that I can tell you something. A few years ago when I was trying to make the transition to eating much more vegetarian meals, I actually said aloud to someone "I seriously cannot think of how to make entire vegetarian meals. I mean, I can think of some side dishes and salads, but then the whole "dinner" ends up being just a bunch of side dishes with no real star of the show..." Shocking, I know. I actually felt that way at one point when I was trying to shed the meat & fish laden foods I had grown up with in Hawaii and wasn't seeing the whole picture about the beautiful, sexy world of vegetables...
Now, if you can believe it, cooking full vegetarian meals is like second nature to me. I would even go so far as to say I can dazzle my completely vegetarian friends at Supper Club. But I also managed to have my carnivore friend, Aja, over for a veggie-filled pasta dinner, and she says to me "This is really delicious, but I did find myself saying where's the meat?!"
If you have ever found yourself in the same predicament or just want to explore more vegetarian cooking--beyond the simple use of marinara sauce and pasta or stir-frying some tofu with veggies--I must recommend a vegetarian bible of sorts (nearly 1,000 pages!). It is such a big book that anything you could possibly imagine is likely to be in its comprehensive index...
Now, Mark Bittman is not a vegetarian, but I think that gives him perspective on how to make similar tasting vegetarian versions of traditional recipes with meat. Like me, he is an omnivore searching for a more health-conscious and planet-friendly diet while also having an appreciation for food and knowledge about balancing your diet. This cookbook is incredibly innovative with recipes that span across all ethnicities and includes thorough descriptions and techniques on how to make things like dough, fresh pastas, sushi, etc. He has endless ideas to really get you motivated to try out some new dishes with sometimes unfamiliar ingredients and most of his recipes are followed by a list of creative variations on that recipe!
Just to give you some ideas, I opened its pages randomly and put my finger on a few recipes such as:
* Buckwheat Stew with Tofu and Kale
* Japanese Egg Crepes
* Braised Tofu with Eggplant and Shiitakes
* Quinoa and Parsnip Rösti
* Chinese Egg Noodles in Soy Broth
* Bulgur Croquettes with Walnuts
* Seitan and Lentil Loaf
I highly recommend this cookbook! I would even recommend it to my vegan friends who can test out their "veganizing" skills by using his recipes as a guideline for making vegan adaptations (and he also has lots of vegan versions or recipes already provided). I am so glad I purchased mine and I think you will be too!
Monday, November 17, 2008
Flying Apron Bakery: Seattle, Washington
Baked goods put a smile on my face. Who doesn't love a good bakery?! When I visit a new city, I like to explore the different levels of bakeries (and restaurants) and always pay attention to recommendations from locals. Always. Always.
There are famous places like Mike's Pastry in Boston where millions of people (including President Bill Clinton) clamor for their traditional italian cannoli's. My friend, Laura, used to live right across the street from Mike's and said that the constant flow of people coming and going was mind boggling. Personally, I wasn't a huge fan of the goodies and thought that the popularity was probably continued by their name and reputation. But I was quite impressed with their immaculate and creative selection of Marzipan. Yes, that is a homemade chunk of marzipan shaped and decorated like a hot dog.
And then there are little hole-in-the-wall places like Magnolia Bakery in New York City that start out perfecting one simple item like a cupcake in a way that is pure, mystifying magic and then can barely keep up with the demand of people lining up around the corner and down the street. In fact, Magnolia's is so completely amazing that I will have to save its review for a separate post (but suffice it to say that I am in awe of these little cupcake gems).
During my recent Seattle visit, my friend Alex took us to this vegan bakery in Fremont in Seattle for a little breakfast goodie buffet.
It's a vegan "sustainable bakery" that uses local ingredients, wholesome organic and unrefined ingredients and all of the ingredients are gluten-free, egg-free, dairy-free and mostly soy-free. Instead, they use all sorts of creative ingredients like garbanzo bean flour, brown rice syrup, palm oil, molasses, arrowroot powder and evaporated powdered cane juice.
Luckily, I was there with friends so we got an assortment of goodies because it really was impossible to narrow down the selection. We got an assortment of scones, maple bars, cookies and other indescribably yummy things!
I liked the bakery for its originality and plethora of interesting flavor and texture combinations, but all told, I wouldn't return because I have had better vegan pastry such as the People's Donuts, the vegan apricot almond cookie at Arizmendi Bakery and, of course, the all time best vegan pumpkin scone I have had in my entire life at Mana Foods in Paia, Maui.
Friday, November 14, 2008
Mission Street Food, San Francisco
The first rule about Underground Dining is you don't talk about Underground Dining. Hahaha...actually, in the foodie world, the opposite is true--all people do is scurry around trying to get their hands on the hippest and hottest so they can blog about it and rave about it to their friends. Word of mouth spreads fast in this big little city, and I'm not just talking about foodie gossip...
When I was in Sydney, there was a guy in Surry Hills who started Table for 20 and opened up his space for friends and strangers and people who want to share in good food. Carl, my co-worker at the time, had been and recommended checking it out, but I never got a chance to!
I have been doing some investigative work of my own into the underground dining scene in San Francisco. My friend Jason is going to check out Radio Africa Kitchen, which is a nomadic restaurant that focuses on using sustainable methods and foods. I will have to find out what he thought of it.
In a similar nomadic vein, Anthony Myint is experimenting by renting out a space in another resturant for one night a week to make innovative yet affordable food for the SF community. "Ideally, this will be part of an indie cooking movement that will let talented cooks reach the public without the risks of opening a conventional restaurant—and let the public enjoy great food without the costs of dining at a conventional restaurant". What a great idea! I had heard about Mission Street Food, but then I saw the Beer and Nosh post and was sold on the photos alone. I thought the menu would be different everytime, but we went lastnight to check it out and the menu was the same as Jessie had described it. So we did what any rational foodie would do when no dish costs more than $7.00: We ordered one of everything to share amongst the group!
I didn't have my camera since we hussled over in a cab as soon as we realized it was Thursday, so thank you to Jesse Friedman of Beer and Nosh for his well-captured photos:
"PB & J" : Kurobuta Berkshire Pork Belly & Jicama w/ pickled jalapeno and cilantro aioli on fresh homemade roti pancakes. ($5.50) The roti was chewy and warm and bursting with a delicate flavor that took me right back to my roti canai obsession when I was in Suva, Fiji. I don't have any photos of those days, but I did come across this awesome photo. You know, roti canai is generally made with a simple list of flour, water, salt and ghee but you can just taste the love that is put into making it...I don't eat pork, but I grabbed a quick inaugural bite of the piping hot roti with a bit of crisp jicama with the really fresh cilantro aioli. It was delicious and my friends, who are pork eaters, loved it too!
"MSF RICE": Smoked Rice fried with duck fat and served with liberty duck confit, cracklins, shitake, scallions and cauliflower. ($7)
My friends loved the rice! I ordered the Vegan VSF RICE, which I loved! It was smoked Rice fried with olive oil and accompanied by breaded tofu, shitake, scallions and cauliflower. ($5.50):
"ONO KAUSWE": Coconut Curry Soup with noodles, spicy chicken, egg, cilantro, lime, chili flakes, and fried shallots. ($6): This dish was....sexy. Silky, thin noodles in a rich, creamy curry sauce with just a faint touch of heat that is mellowed out by the fresh taste of lime and cilantro. Yum!
We also ordered dessert for $2, which was homemade coconut ice cream with a little "fortune cookie". The ice cream was absolutely fantastic. It was smooth and creamy with a rich coconut flavor and a hint of salt--imagine "salted caramel ice cream" but with coconut instead of caramel. Delicious!
I loved the idea. I loved the food. I loved the spirit of the people clamoring to get into a tiny restaurant space that is nearly empty on every other night...
Go get your Mission Street Food. And pass the word on.
Thursday, November 13, 2008
Superhero Breakfast
I promise you, I'm not lying when I say this breakfast will make you a superhero--it is packed with superfoods, minerals, nutrients and antioxidants and will definitely put a spring in your step and get your day going!
Did you know that cacao beans have the highest amount of natural antioxidants you can find--more than blueberries and even green tea! I order my organic roasted cacao nibs from Theo, of course, but you can find them at any good healthfood store or online...
INGREDIENTS:
* 1/4 cup of raw cashew or almond butter (crunchy or smooth)
* 2 Tbsp cacao nibs
* 2 Tbsp shelled hempseed
* 2 Tbsp honey
* 1/2 tsp. ground flax seed
* 1 banana, chopped
Mix it all up on a plate or in a bowl and eat it with a spoon!
Friday, November 7, 2008
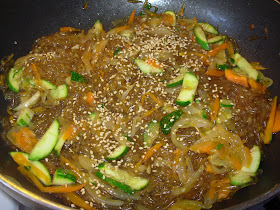
Korean Noodles: Jap Chae
Noodlie noodlie! Who doesn't love noodles?!
There is something inherently comforting about noodles. I've had a long, long, looooong week and the idea of curling up with a bowl of warm noodles really makes me feel a lot better. Have you had a hard week too?! It's understandable, I hear you...well, I think noodles could make you feel better too!
Jap Chae is one of my favorite traditional Korean dishes because it is mildly sweet and I looove the slurpy noodles! It is traditionally made with strips of beef, but I just omit that to make a vegetarian version...You will be able to order them at almost all Korean restaurants, but it is so inexpensive to make that I needed to make a really big batch on my own...One of my favorite places to get them when I am visiting San Diego is at the very authentic Friend's House Korean (4647 Convoy St, San Diego, CA 92111, 858-292-0499). I highly recommend that place!
INGREDIENTS:
* 8 oz. sweet potato starch noodles (Dang Myun)
* 2 Tbsp. canola oil
* 1 small zucchini, julienned
* 1 medium carrot, julienned
* 1 small yellow onion, julienned
* 1 cup chopped cabbage
* 1/4 cup chopped green onion
* 1 Tbsp. toasted sesame seeds (optional garnish)
INGREDIENTS FOR SAUCE:
* 3 Tbsp. Tamari
* 2 Tbsp. light sodium soy sauce
* 3 Tbsp. sugar
* 6 Tbsp. water
* 2.5 Tbsp. sesame oil
* 3 cloves garlic, crushed or finely minced
* 3 Tbsp. mirin
DIRECTIONS:
* Soak the noodles in a bowl of warm water for 15-20 minutes.
* Combine all sauce ingredients in a mixing bowl and whisk together.
* Heat canola oil in a deep pan or wok.
* Sautee onions for 3-4 minutes. Add carrots and cook for another 3 minutes.
* Add in zucchini pieces, green onions, and cabbage and cook for another 4 or 5 minutes until vegetables are tender but still slightly firm.
* Season vegetables with freshly cracked pepper to taste and set aside.
* Place noodles in boiling water for 2-3 minutes. Drain and set aside. The noodles will be slightly al dente, but they will continue to cook in the pan when you add the sauce.
* Return the wok or deep pan to the stove and add the noodles and cook for 1 or 2 minutes.
* Stir in the sauce mixture and cook on high until the noodles soak up most of the sauce.
* Fold in the vegetable mixture.
* Garnish with sesame seeds.
Note: Sometimes I swap out the zucchini for watercress, mushrooms, or napa cabbage.
Love your noodles. Your noodles love you.
Monday, November 3, 2008
The Beer & Cheese Tasting Club Is Growing!
So a couple of months ago, a few beer geeks from Beer Advocate got together and decided it would be fun to start a little Beer & Cheese tasting club, if you will, so that the SF community can get in touch with other beer lovers and foodies and share in good beer and good cheese. Yes, please! There is usually a selected style of beer and a type or style of cheese to go with it (which sometimes turns into a free-for-all cheese party because sometimes you just don't know what type of cheese will bring out the various notes in a beer) and it is generally hosted monthly. It's really fun because 1) there will always be new people to meet since everyone spreads the word and invites friends and 2) there will always be new beers and cheeses to try because that is the ultimate beauty of a pot luck! Admission: One beer and one cheese. Come one, come all with a desire to learn, a desire to share and a desire to be amongst friends.
On August 31, Jason and I hosted the very first installment of the Beer & Cheese Tasting Club. Everybody brought hoppy beers (mostly IPAs and Imperial IPAs), which were paired with sharp cheeses such as extra sharp cheddars and aged goudas. The second gathering found the group tasting Oktoberfest beers (unfortunately, we missed this gathering due to our road trip to Seattle).
This past weekend, we went to the 3rd one (beautifully captured by Jesse from beerandnosh), which was hosted twice in a row by the ever gracious Tim. The theme was focused on dark beers in honor of Halloween. Porters, stouts and specialty beers (including Dogfish Head's Theobroma, which is brewed with honey, ancho chilies, annatto and Askinosie cocoa nibs!) were shared from acclaimed breweries such as Three Floyds (and the ever coveted Dark Lord), Dogfish Head, Southern Tier and Troegs. The cheese array was dazzling...but the best pairings of the afternoon involved big imperial stouts and funky blue cheeses. My favorite cheese was the Montagnolo, which is a Bavarian triple cream soft-ripened cheese (imagine a triple cream brie making sweet cheesy love to a delicate blue cheese and this little baby was born). It was outstanding!
If any of you dear readers are in the San Francisco area and interested in attending a gathering, feel free to get in touch with me on here and I will keep you posted!
Sunday, November 2, 2008
Taco Twist a la Trader Joes
I was in Trader Joe's the other day and they were sampling this unique twist on tacos. I was initially skeptical of the ingredients at first, but it really tasted yummy and unique to my taste buds. So easy. So yummy. So much healthier.
INGREDIENTS:
* 1 jar of your favorite salsa (12 ounces)
* 1 cup raw, unsalted sunflower seeds
* 1 cup raw, unsalted cashews
* Lettuce leaves
Blend the salsa, sunflowers seeds and cashews in a food processor until smooth and then spread a large spoonful onto a lettuce leaf and roll it up like a little taquito or taco. You can also add additional flavorings such as a Tablespoon of taco seasoning. Get creative! It would also be a yummy dip for chips or veggies.
Saturday, November 1, 2008
Incredible Edible Tofu Chocolate Chip Cookies
Is the phrase "healthy cookie" an oxymoron?!
What if I told you that you could have low fat, soft, moist, chewy oatmeal cookies that contain NO oil, NO butter and NO eggs! Really, it is possible, but I bet you are wondering how. I will tell you. But I have to say upfront that even though you might be a little skeptical of the ingredients, you will not believe how amazing these cookies are unless you just trust me and make some! You trust me, don't you?!
Sometimes...sometimes you just need a cookie. Go ahead, you can have two.
INGREDIENTS:
* 1 and 1/4 cups oat bran
* 2 Tbsp. wheat germ
* 1 Tbsp. ground flax seed
* 1 cup whole wheat pastry flour
* 1/2 tsp. salt
* 1/4 tsp. cinnamon
* 1/4 cup chocolate protein powder
* 3 ounces of extra firm tofu, pressed and drained
* 1/4 cup unsweetened applesauce
* 1/4 cup nonfat plain yogurt (or vanilla)
* 2.5 Tbsp. vanilla soy milk
* 3/4 cup all natural peanut butter
* 1 cup sugar
* 2 Tbsp. molasses (secret weapon ingredient!)
* 2 tsp. vanilla
* 1 cup chocolate chips (I used a mix of semi-sweet and white chocolate chips)
* 1/2 cup raisins or chopped walnuts (optional)
DIRECTIONS:
* Preheat oven to 350 degrees.
* In a large mixing bowl, combine the first seven ingredients (oat bran, flax, wheat germ, flour, salt, cinnamon, and protein powder). Use a whisk to stir out any lumps. Note: 1) if you do not have wheat germ or flax, just bump up the oat bran to 1.5 cups or 1.25 cups if you are using oatmeal; and 2) if you wanted to make cocoa cookies, substitute the protein powder for unsweetened cocoa powder.
* In a food processor or blender, puree the tofu briefly and then add the applesauce, yogurt and soy milk and blend on high until smooth.
* In another mixing bowl, combine the peanut butter and sugar.
* Then gently stir in the tofu mixture into the peanut butter and sugar mixture and mix until combined.
* Stir in the molasses and vanilla.
* Slowly add the flour mixture in small batches and gently mix until the dough is formed and no flour mixture remains.
* Fold in the chocolate chips (and raisins or walnuts if you want).
* Use a 1/4 cup or ice cream scoop to measure out fairly large scoops of the batter--these cookies hold together better when larger and they will not spread out much at all.
* Bake for 18-20 minutes and then allow the cookies to cool on a wire rack (the cookies will still feel "under-cooked" and soft to the touch when they come out of the oven, but they are meant to be soft baked cookies!)
These hearty cookies stay moist and chewy, but they do not have a long shelf life so either eat them within a day or two, share them with friends or refrigerate them...
Makes about 15-16 large cookies.
Friday, October 31, 2008
Pumpkin Madness: Halloween 2008
My friends might say that I am the Queen of Throwing Parties. And, well...it's true. There is always Easter Sunday Brunch at my place for all my friends who are in town (this is how I came to be hooked on my friend Claire's chocolate croissant bread pudding). The Wine & Cheese affair might be my favorite gathering because I love wine and I certainly love cheese. A house warming party here. A beer and cheese party there. Lots of dinner parties and Supper Clubs in between. And then there's everyone's favorite: the Annual Holiday Dinner and Beer Tasting. This year, for the very first time, I decided to host a Pumpkin Carving party full of pumpkin beer, pumpkin related foodie goodies and, of course, lots of pumpkin carving. I thought it would be fun if everyone just spread out some newspapers, set up a station and got to work in an effort to win the prize for everyone's favorite pumpkin.
My friend Lindsay brought some pumpkin seed cheese and brie & crackers with pumpkin butter. And I made pumpkin seed pesto, but to be honest, it was a little disappointing so I didn't include the recipe.
Chris the Chef made this amazing, smooth and creamy Roasted Pumpkin Soup with Cinnamon Crème Fraîche (accompanied by turkey meatballs):
I made a Pumpkin, Gruyere & Thyme Gratin:
And Penny made Soft Pumpkin Cookies with a Maple Glaze:
We all had a really good time, didn't we! And, as it turns out, my friends can carve up pumpkins like it's their day job!
Smarty Pants (by Chris and Jenn):
Batty (by Heather):
Joe the Plumber (by Lindsay):
Si Se Puede (by Patrick):
What Tom and I Feel For Each Other (by Penny):
A Flapper Stripper named Candy (by Jason and yours truly):
And Matt & Emily carved an amazing spider in its web, but, sadly, the picture didn't come out for some reason...Sorry!
We had so much fun! I think carving pumpkins has the same effect on people as mass quantities of free popcorn-instant happiness and fun. I once learned how to operate one of those fancy popcorn machines and handed out free popcorn to people at a party and you wouldn't believe the amount of instant smiles that produced...
Happy Halloween! :)
Thursday, October 30, 2008
Pear, Brie & Walnut Galette with a Honey-Pepper Glaze
I really adore the idea of brunch, don't you!? In France, you would call it le grand petit déjeuner, which is essentially a big breakfast or, literally translated, a "big little lunch" (which is the best oxymoron of them all if you ask me). I like everything about it, really. The lazy mornings. Maybe you slept in a little too late. Maybe it's almost 11 o'clock and you can't decide whether you should eat a sweet breakfast or charge ahead to a savory lunch. Maybe you just want to curl up with some tea and relax while you munch on something yummy. In any case, I have just the thing for you--a warm, flaky galette. Not too sweet. Not too savory. Just perfect...
INGREDIENTS FOR HONEY PEPPER GLAZE:
* 1 Tbsp. butter, melted
* 3 Tbsp. honey
* 1/4 tsp. freshly cracked pepper
INGREDIENTS FOR GALETTE:
* 1 recipe Classic Yeasted Tart Dough
* 1 pear (I used a star krimson pear for its bright red skin), sliced into thin wedges
* 1 small wedge of brie, cut into small chunks or strips (or blue cheese if you prefer!)
* 1/2 cup walnuts, roughly chopped
* 1 tsp. raw/turbinado sugar (optional for crust)
* 1/2 tsp. kosher salt (optional for crust)
* 2 Tbsp. butter, melted
DIRECTIONS:
* Flatten out the dough until it is about 1/4 of an inch thick and gently brush some of the melted butter onto the dough (leaving a little bit for the crust edges).
* Starting in the center and leaving about 2 inches of dough on the edges, arrange the pear slices, slightly overlapping.
* Scatter the brie chunks and the walnuts.
* Fold over the edges to just barely cover the edge of the pears and brush the crust with the remaining melted butter.
* Use a pastry brush or spoon to drizzle half of the honey-pepper glaze over the top.
* Optional step: I like to sprinkle some turbinado sugar and kosher salt on the edges of the crust. The dough is not very sweet at all so I like to have a little sweet and salty kick when you bite into it...
* Bake in 400 degree oven for 30-35 minutes or until the fruit is carmelized and the crust is golden brown, but check on it every ten minutes and continue to brush or drizzle on more of the glaze until it is all gone.
Serving suggestion: I like to serve a slice of the galette next to a nice big handful of mixed greens or arugula simply tossed with some olive oil, lemon juice and salt and pepper...
Saturday, October 25, 2008
The Classic Yeasted Tart Dough
There is certainly a soft, buttery little place in my heart for recipes that use frozen puff pastry or filo pastry dough. But sometimes going the extra mile to make some dough from scratch makes all the difference. Plus, it's much cheaper and uses simple ingredients that you will likely already have in your cupboards...
This dough is extremely versatile. I use it to make tarts and little individual quiche cups. But what I really like to use this dough for is making a galette, which is a thin, semi-flaky pastry crust typically filled with various combinations of fruits, nuts, cheeses, and/or vegetables. Galettes are made free form by rolling out the dough, laying out ingredients in the middle and then folding over the edges to create an abstractly shaped "pizza". I find the rustic look so charming...
INGREDIENTS:
* 2 tsp. active dry yeast
* 1 tsp. sugar (if you are making a sweet dish, you can add another teaspoon of sugar, but don't over do it because the dough will not rise properly if you give the yeast too much sugar)
* 3/4 cup warm water
* 4 Tbsp. olive oil
* 1/4 teaspoon salt
* 1.75 cups flour
DIRECTIONS:
* In a large mixing bowl, combine the warm water with the sugar and yeast. Allow that to sit in a warm place for about 10 minutes until it becomes slightly bubbly.
* Add in the olive oil, flour and salt and gently mix with a fork until almost combined.
* Gently use your fingertips to fold in any flour left and knead the dough for up to 3 minutes till it is soft.
* Place ball of dough in an oiled bowl, cover with a kitchen towel and let it rise for about 45 minutes until the dough has doubled in size.
* Roll out the dough on a floured surface, carefully transfer it to a cookie sheet and place it in the refrigerator for about 30 minutes before using it.
Note: You can also freeze the dough and it will thaw out and cook beautifully!
When you want to bake it, I like to keep the oven really hot at about 400 or 425 degrees for a galette (about 35 minutes) or at about 350 or 375 when I am cooking up a quiche (about 45-55 minutes, depending on size of quiche)....
The possibilities are truly endless, but here is a list of some savory and sweet Galette ideas you might want to try:
* Spinach, Carmelized Onions & Fontina Cheese
* Spanish Olives, Manchego Cheese & Arugula
* Tomato, Mozzarella, & Basil
* Fig, Prosciutto & Balsamic Syrup
* Plum with Apricot Preserves
* Potato and Roasted Garlic with Thyme and Rosemary
* Apple & Cinnamon with Marzipan paste
* Pear, Gorgonzola & Honey
* Ricotta and Mint with Meyer Lemon-Honey Glaze
* Pear, Pinenuts & Honey
* Pesto with Sun-dried Tomatoes & Mozzarella
* Sweet potato with Pumpkin-Butter & Pecans
Feel free to share any ideas that you come up with as well! :)
This dough is extremely versatile. I use it to make tarts and little individual quiche cups. But what I really like to use this dough for is making a galette, which is a thin, semi-flaky pastry crust typically filled with various combinations of fruits, nuts, cheeses, and/or vegetables. Galettes are made free form by rolling out the dough, laying out ingredients in the middle and then folding over the edges to create an abstractly shaped "pizza". I find the rustic look so charming...
INGREDIENTS:
* 2 tsp. active dry yeast
* 1 tsp. sugar (if you are making a sweet dish, you can add another teaspoon of sugar, but don't over do it because the dough will not rise properly if you give the yeast too much sugar)
* 3/4 cup warm water
* 4 Tbsp. olive oil
* 1/4 teaspoon salt
* 1.75 cups flour
DIRECTIONS:
* In a large mixing bowl, combine the warm water with the sugar and yeast. Allow that to sit in a warm place for about 10 minutes until it becomes slightly bubbly.
* Add in the olive oil, flour and salt and gently mix with a fork until almost combined.
* Gently use your fingertips to fold in any flour left and knead the dough for up to 3 minutes till it is soft.
* Place ball of dough in an oiled bowl, cover with a kitchen towel and let it rise for about 45 minutes until the dough has doubled in size.
* Roll out the dough on a floured surface, carefully transfer it to a cookie sheet and place it in the refrigerator for about 30 minutes before using it.
Note: You can also freeze the dough and it will thaw out and cook beautifully!
When you want to bake it, I like to keep the oven really hot at about 400 or 425 degrees for a galette (about 35 minutes) or at about 350 or 375 when I am cooking up a quiche (about 45-55 minutes, depending on size of quiche)....
The possibilities are truly endless, but here is a list of some savory and sweet Galette ideas you might want to try:
* Spinach, Carmelized Onions & Fontina Cheese
* Spanish Olives, Manchego Cheese & Arugula
* Tomato, Mozzarella, & Basil
* Fig, Prosciutto & Balsamic Syrup
* Plum with Apricot Preserves
* Potato and Roasted Garlic with Thyme and Rosemary
* Apple & Cinnamon with Marzipan paste
* Pear, Gorgonzola & Honey
* Ricotta and Mint with Meyer Lemon-Honey Glaze
* Pear, Pinenuts & Honey
* Pesto with Sun-dried Tomatoes & Mozzarella
* Sweet potato with Pumpkin-Butter & Pecans
Feel free to share any ideas that you come up with as well! :)
Monday, October 20, 2008
Lentil, Walnut & Flax Burgers with Yogurt-Mint Sauce
I have some great friends...incredibly generous and kind friends. For example, I had dinner with two of my good friends, Matt & Emily, and we got to talking about some awesome Trader Joe's products. I confessed that sometimes I like to see what groceries other people buy (read: you can find me being super nosy about what other people put in their carts at the grocery store) and what other people do with certain products because maybe you wouldn't have thought of it yourself...Anyway, Emily mentions that TJ's sells a bag of pre-cooked lentils, which I had seen before but never felt inspired to purchase because I didn't really have any ideas for them...until Emily, kind as she is, says "I bought an extra one--take one home and try it!" So I did...and I used some to make Ethiopian Mushroom Lentil Stew. Lo and behold, I loved the cooked lentils and will now start buying them!
I have also heard lentils du Puy (the little French green lentils) or black Beluga lentils referred to as "poor man's caviar" because you can literally cook them up with some olive oil and serve them with some crostini and have yourself some cheap, tasty and vegetarian "caviar". But, as you may know, lentils are are incredibly hearty and great for making burgers! They have a lovely, earthy flavor and they are the perfect vehicle for taking on other flavors, spices and preparations. There are lots of recipes out there that tend to be dry and crumbly, but this one is perfectly moist with an exceptional delicate, earthy flavor. Oh, and let's not forget that lentils are generally really cheap and fat-free!
INGREDIENTS FOR BURGERS:
* 3/4 cup toasted walnuts
* 1/3 cup bread cubes or breadcrumbs
* 3 garlic cloves, minced finely
* 1 Tbsp. chopped parsley
* 1 tsp. ground cumin
* 1/2 tsp. kosher salt
* 1/4 tsp. freshly cracked black pepper
* 1 tsp. ground flax seed
* 3/4 cup cooked lentils
* 1 Tbsp. olive oil for burger PLUS 3 Tbsp. for cooking the burgers
* 1 egg, whisked
* Other burger goodies: burger bun, lettuce, thinly sliced red onions, sprouts, sliced tomato and avocado, etc.
INGREDIENTS FOR YOGURT-MINT SAUCE:
* 1/2 cup plain nonfat greek yogurt
* salt and pepper to taste
* 2 tsp. chopped parsley
* 1 tsp. chopped mint
* fresh juice from 1/2 of a lemon
DIRECTIONS:
* Mix all yogurt-mint sauce ingredients in a bowl and set aside.
* In a food processor or blender, combine the walnuts, breadcrumbs, cumin, garlic, parsley, garlic, flax, salt and pepper and blend until fairly smooth.
* Add in the lentils and 1 Tbsp. of olive oil and blend just a little--you still want the lentils to have some chunky texture.
* Put this mixture in a large mixing bowl and combine with the egg.
* Shape into 2 or 3 patties.
* Heat the remaining 3 Tbsp. olive oil in pan over medium low heat and cook the burgers for about 6 or 7 minutes on each side.
* Assemble burger: Toasted bun topped with the yogurt-mint sauce, lentil-walnut patty, lettuce, tomato, red onion, sprouts and avocado....
I am sure you will love this burger! And you will love having ready-to-eat lentils when you need them...
Serving suggestion: For a hearty dinner, serve this burger along side some Baked Sweet Potato Fries. If you wanted a fun appetizer for a party, you could make little mini-patties (the texture is similar to that of falafels), stick a toothpick in them and serve it with the same yogurt-mint sauce!
Sunday, October 19, 2008
Creamy Tomato Bisque
I woke up this morning with a chill on my cheeks. My toes went cold the instant they left the snuggly haven of my ridiculously luxurious king-sized down comforter (a birthday present from my lovely brother, Chad). The sky was a pale grayish white and the house was quiet and still in the early morning. I went to turn on the heater, grabbed a cookbook from the shelf, wrapped myself in a robe and climbed back in bed to read a little...
I had just gotten a big bag of eleven or twelve ripe, juicy tomatoes from my local neighborhood produce store for the unbelievably low price of 75 cents (yes, total!) and wanted to make something special to warm up the house. I decided on a creamy tomato bisque, which is essentially a thick, rich soup that pureed, delicately seasoned with cream added just when you were starting to think the soup couldn't get any better...The secret weapon is steeping a beautiful little herb bundle with parsley, basil and thyme right into the soup before you blend it so the liquid is infused with all of the delicate flavors from the herbs.
Warning: It can take a bit of time to make, but you will be able to taste the TLC in the soup! Also, don't be frightened by the orange color--fresh tomatoes, when cooked down with carrot and onion--don't generally have the deep rich red color you typically think of when you see tomato sauce or tomato paste because those products frequently contain artificial color. This soup will taste like fresh tomatoes straight from the garden...
INGREDIENTS:
* 3 Tbsp. unsalted butter
* 2 Tbsp. olive oil
* 1 large yellow onion, chopped
* 1 small carrot, diced fine
* 9 or 10 ripe tomatoes, peeled and deseeded
* 3 cups stock (chicken or vegetable)
* 1 bay leaf
* little bundle of fresh herbs (parsley, basil, thyme)
* 1 cup of bread cubes (I used the fluffy middle from a sourdough breadbowl)
* 3/4 cup heavy cream
* 1/2 tsp. salt (or to taste)
* some parmesan and extra thyme or basil sprigs for garnish (optional)
DIRECTIONS:
* To peel and deseed the tomatoes, drop them whole into a big pot of boiling water for 30 to 40 seconds and then put them in a colander, run them under cool water and then peel off the skins. Then quarter the tomatoes and use your fingers to push out the seeds over a strainer so you save all the juices and collect the tomato fleshy parts. Set aside.
* Heat olive oil and butter in a big pot on medium high heat.
* Add the onion and carrot and cook until tender.
* Add the tomato pieces and juices you saved and stir.
* Add in the stock, bay leaf and herb bundle and bring to a boil then lower heat and simmer for 25 to 30 minutes.
* Remove the bay leaf and herb bundle and turn off the stove heat.
* Add in the bread cubes and let it soak up some of the liquid.
* Puree the mixture in small batches using a food processor or blender (or stick blender if you have one!)
* Return the pureed soup to a simmer and stir in the cream and salt.
* Garnish if you want...
Comfort. in a bowl. for cold days.
Saturday, October 18, 2008
Vegan Lemon-Basil Aioli
I love a good panini. Like any good sandwich, you need something wet to moisten all the dry ingredients and give the sandwich a good "mouth feel". Here is a recipe for simple aioli that I like to use when I make paninis or other sandwiches...
VEGAN LEMON-BASIL AIOLI
* 1/2 cup Vegenaise (I like the grapeseed oil version)
* 3 Tbsp. olive oil
* 1/2 cup packed basil leaves
* 1 tsp. lemon juice
* 1 garlic clove, minced finely
* sea salt to taste
You can combine all of the ingredients into a blender or food processor for a smoother texture, but I like to bash up the basil in a mortar/pestle with the olive oil and then scoop it into the a bowl with a rest of the ingredients and mix it by hand for a more rustic texture and look. Also, it is vegan because I use Vegenaise not because it is egg free and dairy free, but because I genuinely prefer its creamy taste to commercial mayo (but it's a whole other story if we are talking about homemade mayo, which can be outrageously luxurious)...But you can just use mayo instead if you prefer.
Note: In case, technically an aioli isn't just flavored mayonnaise--traditionally, it is a blend of garlic and olive oil with other additions...
Monday, October 13, 2008
Tempura with Creamy Miso-Mayo and Miso Soup with Watercress
Yesterday was one of those lazy Sundays where nothing really "gets done" but I just luxuriously spend all the time indulging myself in naps, walks, cooking something creative and amazing and watching movies. I can't say enough how much I love those days.
Our new neighbors-an adorable married couple and their black and white cat-just moved in a few days ago and, to my complete delight, the husband is a chef! Once inside their apartment, I was so tickled to look through his cookbook selection--I ran my fingers along the over-sized photo books and started contemplating what book I might ask to borrow...This, as it turns out, was an easy choice to make because there--in all of its complicated shining glory--was Nobu Matsuhisa's cookbook for NOBU. I immediately felt a deep craving for the tempura rock shrimp and felt inspired to try my hand at some tempura. Tempura is one of my favorite things to eat, but it can be tricky to really pull off a fantastic tempura batter that is light, airy and crispy without being weighed down by oil. Nonetheless, I was sure I could at least give it a go.
Shrimp, Avocado and Mushroom Tempura with Creamy Miso-Mayo on a bed of Lemony Arugula greens:
However, I am really sorry to report that this kind of "self-teaching" process of cooking doesn't always lend itself to having precise recipes. I'm so sorry. I really wanted you to make it too! In my sheepish attempt to make up for such shortcomings on the tempura batter (which arguably may be the best part), I do have a recipe for the Creamy Miso Mayo and Creamy Miso Soup with Watercress that I created for just such an occasion.
INGREDIENTS FOR CREAMY MISO MAYO:
* 1/3 cup mayo
* 1 Tbsp lemon juice
* 1/2 tsp Braggs liquid aminos
* 3 Tbsp white miso paste
* 2 tsp mirin
DIRECTIONS: Whisk together all ingredients (consistency should be fairly thin).
INGREDIENTS FOR CREAMY MISO SOUP WITH WATERCRESS:
* 2 cups dashi broth
* 3/4 cup soymilk
* 1 bunch watercress
* 2 Tbsp white miso paste
* 1 Tbsp Braggs liquid aminos
* 1 Tbsp Low-sodium soy sauce
DIRECTIONS:
* Separate the watercress leaves from the stems.
* Chop the stems and add it to the dashi broth and bring to a boil for 5 minutes.
* Blend broth and stems in a blender (be careful about the steam) and then strain out the stems through a mesh colander or a tea steeper or cheesecloth sieve. This step really gives the soup a light, grassy watercress flavor, but you can skip it if you want and avoid blending and straining altogether--just discard the stems.
* Return broth to stove, add soymilk and return to a boil.
* Add miso paste, liquid aminos and soy sauce and simmer for 3-5 more minutes.
* Add in watercress leaves just before you are ready to serve the soup (otherwise the leaves will wilt and turn a pale green color).
Note: This is really just a jazzed up version of the classic soup, but the soymilk and watercress really keep it light and healthy while adding a richness and depth that is really quite delicious (Oishi!)!
Also, the Braggs liquid aminos is similar to soy sauce I suppose if you want to substitute it, but liquid aminos has a pretty unique flavor--and it has 4 times LESS sodium than low-sodium soy sauce (can you believe that?!) so it is much healthier. You can find it in almost any health food store or even some grocery stores. I put mine in a spray bottle and use a squirt or two in soups, sauces, gravy, salad dressings or even just on an avocado (yes, it's yummy!).
I took a tasting portion over to my neighbors to thank them for lending me the NOBU book...Then, I immediately sat down to eat this amazing food and tried to ignore the elephant in the room furiously waving a neon sign that said "You should have gone to culinary school instead of law school".
Sunday, October 12, 2008
Hemp Protein Shake
I somehow acquired this Vanilla Spice Hemp Protein mix at San Francisco's Green Festival--where I also tried all sorts of hemp products like hemp seed brownies, hemp butter and, yes, hemp milk! I wasn't really a fan of the hemp milk, but I am a dedicated fan of shelled hemp seeds and I add those to cereal, oatmeal, and breads (or anything else that you want to lend a nutty flavor to while adding protein)...
This shake mix contains 12g of dietary fiber, 13g of protein and a very high amount of magnesium, iron, potassium and calcium! I whizzed mine up with some frozen bananas (for a creamy texture) and vanilla soy milk and topped it off with some whipped cream and a sprinkle of cinnamon sugar...
Note: I have to admit that it did have a bit of a gritty texture...
Friday, October 10, 2008
Ethiopian Mushroom Lentil Stew
Hello again.
Thank you for being so patient while I was gone on my roadtrip to Seattle and Portland...and would you believe that we did so much in the span of one week that I came home and needed a week vacation from that vacation?! I'm sure you know how that feels.
I still haven't uploaded my photos yet (but I will!), but I wanted to mention a cute little Ethiopian restaurant in Portland called Queen of Sheba (recommended by the nice man at Powell's City of Books) that literally saved us from starving as we got into the city late and didn't know where to go to fill up our empty bellies...If you aren't familiar with Ethiopian food, remember that it tends to be quite spicy (lots of jalapenos and other peppers are used)...order the vegetarian sampler platter and you will get a huge platter with 8 or 9 dollops of their various vegetarian dishes over layers of that distinctively sour Inerja crepe-like bread (no utensils are on the table so you roll up your sleeves and use the inerja to scoop up the food!). Do a google image search for ethiopian food and you will see some awesome stuff! The food and presentation really is lovely and the flavors vary from restaurant to restaurant so it's always fun to try new places. For the record, Portland's Queen of Sheba was DELICIOUS (the Inerja was outstanding!) and I highly recommend it if you get the chance!
I live right across the street from Axum in San Francisco and I adore their vegetarian platter. I have gone with a big group of 6 friends and we can get a HUGE platter of food to feed us all for $45!!
Most Ethiopian dishes are made with a traditional spice blend called Berbere. Since I am generally not a fan of spicy food, I've decided to take up cooking some Ethiopian dishes at home (and then just run across to Axum and buy some Inerja) so that I can control the amount of spice! Berbere blends can be either a dry mix or a wet paste and vary greatly from region to region (or restaurant to restaurant), but here is one that I use:
BERBERE SPICE BLEND:
* 2 tsp ground cumin
* 1 tsp freshly cracked black pepper
* 1/4 tsp turmeric
* 1 tsp ground fenugreek
* 1 Tbsp paprika
* 1/2 tsp dried thyme
* 1/4 tsp ground cardamom
* 1/8 tsp cloves
* 1/4 tsp ground coriander
* 1/8 tsp allspice
* 1/8 tsp cinnamon
* 1/8 teaspoon cayenne pepper (omit if you don't like it spicy!)
* 1/2 teaspoon salt
So, with all this talk of Ethiopian food, I thought I would leave you with a very special recipe I created for Ethiopian Mushroom Lentil Stew. It's the least I can do. I walked right across the street to Axum and bought some Inerja for this meal (because from what I can tell by reading recipes, it is not very easy to make).
Clockwise: Mushroom Lentil Stew (recipe below), Shiro Alitcha (slow cooked split peas cooked with turmeric and onions) and Okra Tomato Stew served with Inerja and some salad and a scoop of plain yogurt:
ETHIOPIAN MUSHROOM LENTIL STEW
INGREDIENTS:
* 2 Tbsp. canola oil
* 1 large yellow onion, diced finely
* 2 cups diced mushrooms (baby bella or cremini have great texture for this dish)
* 1 cup cooked lentils (brown or green)
* Berbere spice mix (see above)
* 4 or 5 cloves garlic, minced
* 2 Tbsp fresh ginger, grated finely
* 1 can tomato paste
* 1.5 cups vegetable stock
DIRECTIONS:
* Heat oil in a deep pan on medium-high heat.
* Sautee onions for 5-7 minutes until they become slightly transluscent.
* Add in diced mushrooms and cook for another 5 minutes
* Mix in the minced garlic, grated ginger and spice mix and stir well.
* Add in the lentils and mix together.
* Add tomato paste and stock and stir thoroughly.
* Allow to simmer for 25-35 minutes or until most of the liquid has reduced down (should have the texture of a fairly thick stew).
Assembling a platter of ethiopian food is so much fun! I put a big round piece of Inerja on the biggest plate or platter I can find, scoop the stew or various dishes onto the inerja. Then I like to do something a little less traditional--I put a small heap of lettuce leaves tossed with fresh lemon juice and a drizzle of olive oil and salt and pepper and then a little dollop of plain yogurt thinned out with fresh lemon juice just to cool things down a bit....
I still don't know much about Ethiopian food and cooking preparations, but do know one thing--it is best when shared with a group of friends. Dive in and get your hands messy!
Medicine: a new-shojin eatstation, San Francisco
When I was living in London (and thenafter Sydney), my friend, tiffany said "you HAVE to go eat at Wagamama". So I did, because Tiffany knows all great spots when it comes to bars, food and bars. Wagamama is a pan-Asian noodle bar of sorts with cafeteria-style seating (Americans generally aren't used to sitting right next to another person with your elbows touching, but it didn't seem to bother anyone in London or Sydney). And oh boy, is it yummy for those days when nothing sounds better than noodles, and lot's of it. Actually, my favorite dishes were Amai Udon (udon noodles with a sweet tamarind sauce, teppan-fried with egg, fried tofu, prawns, red onions, leeks and beansprouts and topped with crushed roasted peanuts and a fresh wedge of lime) and the vegetarian katsu plate, which came with slices of sweet potato, zucchini and butternut squash deep-fried in Japanese panko breadcrumbs and served with a mild curry sauce and sticky white rice. The Amai Udon is sort of like a Japanese version of pad thai and I immediately went home and recreated a recipe for it if you are interested...
Anyway, Tiffany happened to be in town and wanted to meet up for a quick lunch...ah, the office lunch. For me, there are the days where 10 hours pass in the span of what feels like 10 minutes and you suddenly realize that an unacceptable number of hours have passed without eating. There are days that swallow up the lunch hour and I am caught snacking on raisins, walnuts, dried fruit. And, of course, there are days where I sneak away from my desk to eat some good 'ol lunch brought from home (which generally consists of salad or dinner leftovers). But the extra special treat, for me, is when I can escape the office altogether for that precious hour to meet my friends who work near my office and try new restaurants...So I decided to take Tiffany to Medicine because, sadly, San Francisco does not have a Wagamama...
I have now eaten several of their dishes and, while it is no Wagamama, it is certainly unique and yummy (and they also don the cafeterian-style seating). Their signature is a sushi roll made with a purplish-colored 9-grain rice. My favorite appetizer is the Shiitake Croquettes--a mash of Japanese mountain yam, buttery sweet potato and shiitake, breaded and fried in panko breadcrumbs and served with a Tonkatsu-style dipping sauce. The curry udon is a big bowl of udon noodles in mild, creamy curry sauce (which is made from kombu, avocado, apple carrot, roasted soy beans, coconut milk, lemon and a secret spice blend) and they give you a bamboo wooden spoon to help you slurp up the noodles. But I think my favorite is the Miso-marinated tofu bento box (who doesn't love the Bento box with all sorts of yummy unexpected goodies??). It is tofu broiled with a thick, sweet yet salty paste made with pinenuts, pistachios and miso and then put under a broiler until it turns golden brown and sticky...
Oh, and I hope you can forgive me for forgetting my camera...somehow i flew out the door for the Office Lunch with out it...
Tuesday, September 23, 2008
PB&J Madness
I once got into an argument with a stranger over whether an "adult" can still eat peanut butter and jelly sandwiches (affectionately known as PBJ's). It's the truth. She claimed that those who eat PBJ's never really grew up into adulthood. I can't remember the end result of this ridiculous debate....perhaps we had to agree to disagree...oh, and something along the lines of "I eat PBJ's when I want!"
If you ever make pancakes, put a little dollop of peanut butter in the pancake right after you have poured the batter onto the hot griddle. Then heat up your favorite jam and use it in place of maple syrup. Trust me, you will be so happy to discover PB&J pancakes. Or, make a classic PB&J, lightly butter both sides of the bread and grill it just you would for a grilled cheese sandwich...YUM.
You know, I recently discovered that this SF bar called Butter, which you might hear referred to as "a classicly trashy bar" that serves forty's of Miller High Life, jello shots and deep fried twinkies (among other things). I have to say that, before Butter, I have never seen a menu that made me want to laugh as though it was a comic strip about robot porn. I mean, just imagine yourself ordering drinks called Whitetrash Driver (good 'ol vodka and Sunny-D) or a Shotgun Wedding while keeping a straight face!...Of course, my latest girls-night-out adventure landed me at Butter with a forty in one hand, jello shot in another while listening to some 90's hits...out of the corner of my eye, I catch their specials scribbled on a board. Deep fried PBJ. Gasp! Really?! I spent a good ten minutes wondering why I hadn't thought of this treat myself. It surprised me.
And then there was Stone Brewery in San Diego, whose menu is always full of fresh and creative ideas (like Mac 'n Beer Cheese). I was so happy to find their creative version of PBJ: a slather of pistachio butter, local apricot jam and a semi-soft cheese, which was all pressed between delicate slices of bread similar to ciabatta. It was one of the best panini sandwiches I have ever had....They mix up the type of preserves and cheese from time to time, but I am sure it is always reliably magical. Stone also has a very creative daily vegetarian special, which you can sign up to receive by email if you are ever at a loss for recipes and want to be inspired by unusual dishes.
p.s.--I also prefer to eat my waffles with PB&J. Try it! Feel free to share your favorite PB&J combinations/variations...
I am heading out this morning on a road trip to Portland/Seattle and you know I have packed all the PB&J fixins!
Happy PB&J eating! :)
Thursday, August 28, 2008
Creamy Hummus
This past week I took my mom to try Lebanese food for the first time. We were in San Diego, so I took her to Mama's Bakery & Deli and ordered a feast (to be shared with eight people, including my mom). I can't say that she loved it, but I did!
I was really surprised to see that they make their own flatbread for wraps. My favorite menu item was the garlic chicken wrap made with soft and warm schawerma chicken with a garlicky paste, lettuce, parsley and little cornichon pickles...Personally, I am a big fan of garlic so I loved it!
I also really love to make homemade hummus. Ironically, the first time I made homemade hummus was in 2003 in England. No, really! It's a long story...but we even soaked dry chickpeas for it! I don't think that was really necessary, and to prove it, I am going to share with you my favorite hummus recipe. I hope you don't mind, but it is a little on the non-traditional side because it has some extra goodies in it to make it really yummy, but I promise that you will not be disappointed.
INGREDIENTS:
* 2 garlic cloves (do NOT use old garlic or it will have a strong bite!)
* 1 can of organic garbanzo beans plus 2 Tbsp. of the liquid (low sodium, if possible)
* 1/2 tsp. kosher salt
* 3 Tbsp. lemon juice (about half of a lemon)
* 2 Tbsp. tahini
* 2 Tbsp. smooth peanut butter (secret ingredient!)
* 1/2 tsp. sesame oil
* 1/4 cup extra virgin olive oil
* 2 Tbsp. sour cream (optional)
* Garnish with fresh parsley and paprika and a drizzle of olive oil on top!
DIRECTIONS:
* Place all ingredients in a blender or food processor and process until very smooth.
Serve with flatbread, pita, pita chips or fresh vegetables.
Note: This makes a fairly thin hummus, so if you prefer it to be thicker, just add another half of a can of garbanzo beans to reach your desired consistency.
I know what you're thinking--it's a bit unconventional to put peanut butter in hummus. But maybe, just maybe, if you trust me even one iota, you will just close your eyes, scoop the creamy goodness out of the jar and put it in there and you will be so glad you did....
Wednesday, August 27, 2008
Polenta Cakes with Tomato and Basil
I am so sad the summer season is coming to an end...I still want to bite into sweet early girl tomatoes and eat them like apples and scurry into my grocery store to buy 8 (yes, eight) ears of fresh corn for $2.00. Unfortunately, fresh tomatoes do not freeze well...but, fresh corn does! I just cut all the kernels off the cobs, put them in a ziploc freezer bag and freeze them for later use...I mean I'm not about to tell the Green Giant to his face that canned corn tastes like household cleaning products, but I try to use fresh (or freshly frozen) corn if at all possible...And when I can't have fresh corn, I make polenta. or my favorite super duper easy and fast polenta cakes.
INGREDIENTS:
* 1 polenta log
* 1 jar of your favorite bruschetta topping
* fresh basil for garnish
* canola oil for shallow frying
DIRECTIONS:
* Cut the log of polenta into slices (about 1/2 to 3/4 of an inch thick).
* Heat some oil in a pan on medium high.
* Shallow fry the polenta rounds until the edges turn crisp--flip them occassionally to get both sides.
* Remove polenta cakes from pan and drain any excess oil on a paper towel.
* Top each round with a spoonful of bruschetta and sprinkle it with basil.
* If you want, you can also top the rounds with some freshly cracked pepper and/or sea salt to taste.
I haven't met a single person who didn't swoon over these things...
Friday, August 22, 2008
Sugar Cookie Cream Cheese Bars with Fruit
My cousin's wife, Tara, makes outrageously gorgeous cakes as a hobby of hers and oh my does she know how to make a cake! I keep telling her she should make it into a business, but now she is a full time mommy with two little boys that keep her very busy. Her son, Kyan, had his first birthday and she made this amazing caterpillar cake for the birthday party. That's Kyan reaching for a delicious fistful of cake in hopes to ruin it before we have finished singing Happy Birthday...and that's Tara's hand trying to prevent him from doing so...And here are some other photo's of her exceptional handiwork:
I am so incredibly impressed with her cakes--aren't you?! Tara, you are amazing!
For our family's Fourth of July party this year, Tara made a very simple fruit tart--think soft, chewy sugar cookie with a cream cheese filling with fruit on top! It was such a big hit at the party that I thought I would share the recipe because it is so simple, you just won't even believe it!
INGREDIENTS:
* 1 roll of slice-n-bake sugar cookie dough (I highly recommend seeking out an all natural brand like Cookie Love to avoid partially hydrogenated oils)
* 1 package of all natural cream cheese
* 1/3 cup sugar (preferably evaporated cane sugar)
* 1 tsp pure vanilla extract (no imitation!)
* fruit for topping (blackberries, raspberries, blueberries, kiwi, and/or mango)
DIRECTIONS:
* Flatten out the dough in a greased 9x13 pan and bake at 350 degrees according to directions on package--it should turn just slightly golden brown but still be a little undercooked. Set aside to cool completely.
* In a mixing bowl, combine cream cheese, sugar and vanilla until creamy and smooth.
* Use a rubber spatula to smooth the cream cheese mixture out on top of the cookie layer.
* Arrange fruit as desired and refrigerate for at least one hour.
You will be shocked by this simple, yummy dessert!
Another yummy variation is to add 1/4 tsp. of cinnamon and 3 Tbsp. maple syrup to the cream cheese mixture and, instead of fruit for the topping, sprinkle 1/2 cup of toasted and chopped pecans...
Thursday, August 21, 2008
Fresh Ricotta with Figs, Pistachios, Walnuts and Honey
In the summer of 2005, I got a fancy job working at a US-based law firm in their London office (I also lucked out with the World's Best Boss who took me all around London and even took me to Wimbledon 2005, but that is another story entirely). I rented a flat near the Baker Street tube station--right across from St. Regent's Park. It was perfect. I used to rush home from work, crammed in an insanely packed train trying to avoid having my face smooshed into someone's sweaty armpit, drop my things off at my flat, wiggle out of my suit into some jeans and a sweater and run out to the park to sit by the water and watch the clouds change shapes...
It was also that same summer that I became hopelessly addicted to a brand of strawberry yogurt called Biopot (funny, i know) and became affectionately known amongst my flatmates as the "biopot-monger" because I literally ate a tub a day of the stuff (luckily, it was easy to find at any Tesco corner store). I liked Rhubarb-Vanilla flavor too but the strawberry--oh, the strawberry....it was thick (but not too thick) and incredibly creamy and probably mixed with a wildly addictive dose of crack. There is something remarkably different about yogurt purchased in Europe that makes U.S. yogurt seem thin and watery and shamefully inferior...Since that summer, I have become a huge fan of mixing yogurt with fruits, nuts, berries, granola, and cereals...
I have since branched out (expanded, if you will) from yogurt so, I thought I would share another one of my favorite dishes to have for breakfast--it is extremely flavorful and light with all the right textures and flavor combinations...
INGREDIENTS:
* 1/4 cup fresh ricotta
* 1/2 cup fresh figs (green or black), quartered
* handful of pistachios, chopped
* handful of walnuts, chopped
* 2 Tbsp. honey to drizzle
Word to the wise--never underestimate the seductive combination of figs and pistachios. Or ricotta and honey.
Monday, August 11, 2008
Zucchini Carpaccio
Carpaccio is traditionally made with beef, but there are countless variations cropping up on restaurant menu's and cookbooks. One of my favorite versions is carpaccio made with fresh sashimi grade ahi tuna...My farmer's market is brimming with such gorgeous veggies that I figured I should make a carpaccio with a vegetable! Yes, it can be done! Warm summer months call for inventive and unique spins on the good ol' salad...
This is a dish that is maddeningly easy to make, but exceptionally impressive!
INGREDIENTS:
* 1 small or medium zucchini (green or yellow or both!!)
* good quality olive oil for drizzling
* 2 Tbsp. fresh ricotta
* 3 Tbsp. fresh herbs, chopped (parsley, chives, chervil, and/or mint)
* 2 tsp. lemon zest plus a nice squeeze of lemon juice
* kosher salt & freshly cracked pepper to taste
The trick is to buy small or medium sized zucchini so it is easy to shave into very thin slices with a vegetable peeler (or mandolin if you have one, but it is totally not necessary). You simply shave the zucchini into paper thin slices, arrange in a flower like design on a plate (working from the outside inwards). Sprinkle the fresh herbs on, drizzle the olive oil, lemon juice and lemon zest, scatter a few dollops of ricotta, salt and pepper it to taste and that's it! It really IS that simple, I promise.
Simply gorgeous.